Create SIP Trunk
In this mode, user need to create trunk on Cloud PBX/Local PBX first. Here, we use Yeastar P series Cloud PBX for demonstration, for the details of operation of this steps, please refer to the user’s guide of your PBX or contact your operator:
- 1.Login to the PBX’s Web management interface;
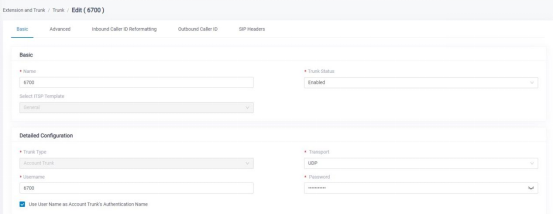
- 2.Navigate to Extension and Trunk -> Trunk, click “Add’;
- 3.Fill in the name to identify this trunk, select Enabled in “Trunk Status”, select“Account Trunk”in “Trunk Type”;
- 4.Fill in the user name and password,tick the selection“Use User name as Account Trunk’s Authentication Name”.
- 5.Click “Save”, and “Apply” the changes

Note: If you need to use two PSTN line,please create another SIP trunk.
SIP Trunk is a method to convey the PSTN call to PBX, so you can answer a PSTN call on IP Phone through a cloud PBX or local PBX or make a call to mobile phone easily. Users can also configure some advanced function, which is depends on the PBX. The following section is the configuration steps of basic function, please connect FTA5120’s FXO port to your PSTN line before the configuration.
FXO Registration
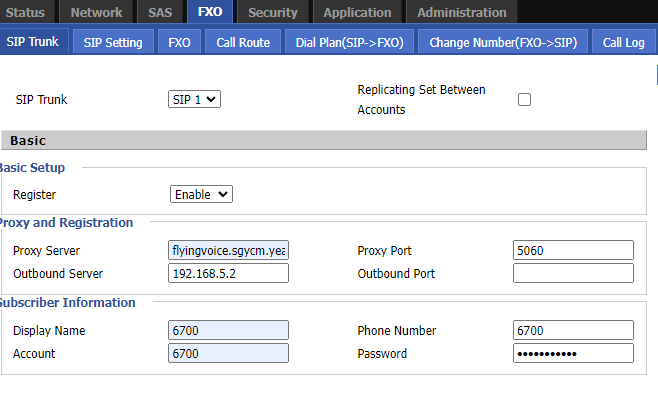
- 1.Login to the Web interface of FTA5120, Navigate to FXO -> SIP Trunk, select SIP 1 in “SIP Trunk”,enable “register”;
- 2.Fill in the PBX’s domain Name(IP address), If you have an outbound server for this, please fill in the IP address of outbound server in the blank “Outbound Server”;
- 3.Fill in Display Name, Phone Number, Account and Password according to the configured items in section 2.2.4;
- 4.Click“Save&Apply”.

Note:
- If you need to use two PSTN line, please select SIP 2 in “SIP Trunk”and register another SIP trunk.
Author:admin Create time:2023-12-01 18:49
Last editor:admin Update time:2023-12-04 16:45
Last editor:admin Update time:2023-12-04 16:45
